Knit Kids Mittens
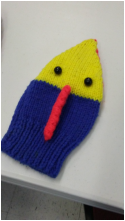
Figure fun into an ordinary pair of mittens with these critter characters. Frog or Mouse
Knit Animal Mittens / Available free on Ravelry!
These adorable critter mittens will be a hit this winter.
Jeri's TIPS:
1. Remember the issue of little things getting into little mouths. Make sew-on eyes, and other facial features.
2. Put the facial features on the pieces before sewing the mitten together.
3. Suggestions: use bobbles for the frog eyes instead of pompoms. Knit small circles for the mouse ears.
4. with a little imagination and creativity a knitter can adapt this pattern to make other animals as well. Perhaps a different animal for each hand would keep a child amused for a boring car ride!
Figure fun into an ordinary pair of mittens with these critter characters. Frog or Mouse
Knit Animal Mittens / Available free on Ravelry!
These adorable critter mittens will be a hit this winter.
- Size 3 (3.25mm) and size 5 (3.75mm) straight knitting needles or sizes needed to obtain correct gauge
- stitch holder
- thread to match pom-poms
- tapestry needle
- scissors
- FOR MOUSE MITTENS:
- Worsted-weight yarn—1 ounce of gray, 20 yards of pink and small amounts of white and black
- pom-poms—two 3/8-inch pink and four 1-inch white
- black heavy thread
- FOR FROG MITTENS:
- Worsted-weight yarn—1 ounce of green and 20 yards of pink
- four 1/2-inch green pom-poms
- four sew-on 10mm movable eyes
- Every Row: * K 2, p 2, repeat from * across row.
- STOCKINETTE STITCH: St st
- Row 1 (RS): Knit.
- Row 2: Purl.
- Repeat Rows 1 and 2.
- SEED STITCH: Seed st (Multiple of 2 sts, plus 1)
- Every row: K 1, p 1, repeat from * across row, ending with k 1.
- CHANGING COLORS: Use a separate ball or yarn bobbin for each color. When changing colors, cross yarns around each other on wrong side of work, passing the yarn used for the last stitch in front of the new color to prevent holes.
- Knitting Abbreviations
- dec decrease
- inc increase
- k knit
- p purl
- psso pass slipped st over
- rem remaining
- beg beginning
- lp(s) loop(s)
- rep repeat
- rnd(s) round(s)
- RS right side
- sl slip
- st(s) stitch(es)
- tog together
- WS wrong side
- yo yarn over
- * or [ ] Instructions after * or between brackets are repeated a given number of times.
- ( ) Instructions in parentheses are all worked in one stitch or space as indicate Heads up
- Heads Up! The mitten ribbing directions include the entire mitten cuff. It is split with half the stitches put on a holder, to then make the top and bottom mitten parts.
- Instructions
- BODY: With size 3 needles, cast on 28(32,32) sts with gray for mouse and green for frog. Work in k 2, p 2 rib for 4 inches (all sizes). Change to size 5 needles and work in St st for 1-1/4(1-3/4,2-1/4) inches.
DIVIDING ROW: K 12(14,14) sts for chin, sl rem 16(18,18) sts to a holder.
CHIN (C): Work in St st for 1(1-3/4,2-1/4) inches, then decrease as follows: - C Row 1: K 2 tog, knit across to last 2 sts, k 2 tog: 10(12,12) sts.
- C Row 2: Purl.
- C Row 3: Repeat C Row 1: 8(10,10) sts.
- C Row 4: P 2 tog, purl across to last 2 sts, p 2 tog: 6(8,8) sts.
- C Row(s) 5(5-6,5-6): Repeat C Row(s) 3(3-4,3-4): 4 sts remain at end of C Row 5(6,6).
- C Row 6(7,7): Size small only: P 2 tog twice; sizes medium and large: K 2 tog twice: 2 sts. Cut yarn and draw through rem st.
- HEAD: Place 16(18,18) sts from holder onto needle.
- Both Mittens: Rows 1-4: Work in St st.
- Mouse (M): M Row 5: K 4 gray, k 3 white, k 2(4,4) gray, k 3 white, k 4 gray.
- M Row 6: P 4 gray, p 1 white, p 1 black, p 1 white, p 2(4,4) gray, p 1 white, p 1 black, p 1 white, p 4 gray.
- Frog (F): F Rows 5-6: Work in St st.
- Both Mittens: Using gray for mouse and green for frog, work in St st until head measures 1-1/4 (1-3/4, 2-1/4) inches from dividing row. Repeat C Rows 1 through 7 until 2 std remain. Cut yarn and draw through rem st.
- MOUTH: For both mittens, cast on 5 sts with pink. Work 1 row of seed st.
- Increasing 1 st in last st of each row, continue in seed st, working additional sts in pattern, until piece measures same length as back of hand.
- Next 2 Rows: Work in St st.
- Work in seed st pattern until piece measures same length as chin up to the beginning of decreases. Keeping in seed st, decrease 1 st at end of each row until 3 sts remain.
- Last Row: K 1, k 2 tog. Pass slipped st over rem knit st. Cut yarn and draw through rem st.
- FINISHING:
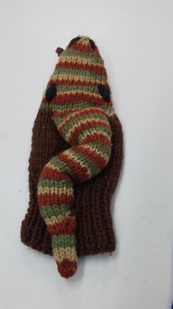
- Mouse: Use matching thread to sew white pom-pom ears and pink pom-pom nose onto mittens in positions shown in photo above.
- With black heavy thread and tapestry needle, add a thread whisker below nose, leaving a 1-1/2-inch thread end on one side of nose, making two small backstitches just below nose and trimming ends to extend out 1-1/2 inches on opposite side of nose. Repeat two more times.
- Frog: Use matching thread to sew green pom-poms in position as in photo. Sew a movable eye on each pom-pom.
- Both: Use matching yarn to sew side seams of mittens together up to mouth. Sew mouth to body with knit side of center of mouth on right side.
- FINISHED SIZE: Directions are for a Child’s Small. Changes for sizes Medium and Large are in parentheses. Actual mitten length measurements are 7-1/2(8-1/2,9-1/2) inches.
GAUGE: In St st with size 5 needles, 10 sts and 15 rows = 2 inches.
STITCHES USED: - KNIT 2, PURL 2 RIBBING: K 2, p 2 rib
Jeri's TIPS:
1. Remember the issue of little things getting into little mouths. Make sew-on eyes, and other facial features.
2. Put the facial features on the pieces before sewing the mitten together.
3. Suggestions: use bobbles for the frog eyes instead of pompoms. Knit small circles for the mouse ears.
4. with a little imagination and creativity a knitter can adapt this pattern to make other animals as well. Perhaps a different animal for each hand would keep a child amused for a boring car ride!
|
|
